Webhooks
Webhooks in Zenoo allow you to send data to third-party services, enabling seamless integration with various applications.
Follow these steps to set up and use Webhooks effectively:
Access Webhook Configuration
Log in to your Zenoo account and navigate to the project where you want to set up Webhooks.
In the project dashboard, click on "Workflow" to access the workflow editor.
Identify the point in your workflow where you want to trigger the Webhook. This can be after specific data collection or verification steps.
Add Webhook to Your Workflow
Click on the plus icon (+) at the desired workflow point to add a new interaction.
Search for and select the "Webhook" interaction from the available options.
Configure Webhook Settings
In the Webhook configuration window, you'll need to specify several settings:
- Title: Provide a clear title for your Webhook interaction.
- URL: Enter the URL of the API endpoint where you want to send the data. This is typically provided by the third-party service you're integrating with.
- JWT Encryption: Decide if you want to encrypt the data using JWT. Toggle this option based on your security requirements.
- JWT Secret: If you choose to encrypt the data, enter the JWT secret key provided by your third-party service or generate your own.
Additionally, you can map specific fields from your Zenoo workflow to the Webhook. This allows you to send relevant data to the third-party service. Click on "Add Field" to map data fields. Once you've configured the Webhook settings and mapped the necessary fields, click "Save" to add it to your workflow.
Before you deploy!
Before deploying it in a live environment, it's advisable to test the Webhook. Run a test journey to ensure that data is correctly sent to the specified URL.
Multiple Webhooks in the Flow
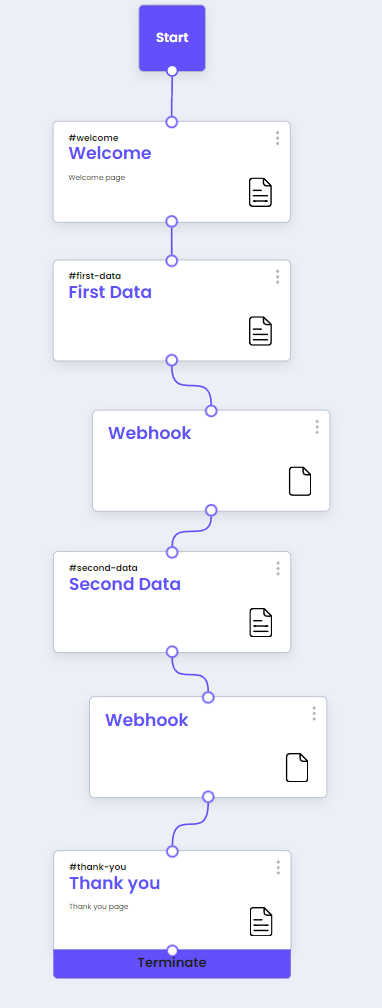
If your workflow requires multiple webhooks at different stages, you can easily add as many webhook interactions as needed.
The process remains the same, but with each additional webhook, the data from previous steps is automatically aggregated. This means that as the flow progresses, each subsequent webhook will include not only its own data but also all the data from earlier steps.
For example, in a flow with two webhooks:

On the first page "First Data", the user is asked for their "First Name".
On the second page "Second Data", they’re asked for their "Last Name".
Since a webhook is triggered after each step, the results will look like this:
The first webhook will send something like:
{
  "FirstName": "value"
}
The second webhook will send its own data along with the previous data:
{
  "FirstName": "value",
  "LastName": "value"
}
Good to know
Webhooks collect and combine data throughout the flow. This feature ensures that the end system receives all the gathered data at the final webhook call.
It’s especially useful when comparing earlier and later data or when tracking user drop-off at certain points in the flow.
Updated 3 months ago